Wednesday, October 30, 2013

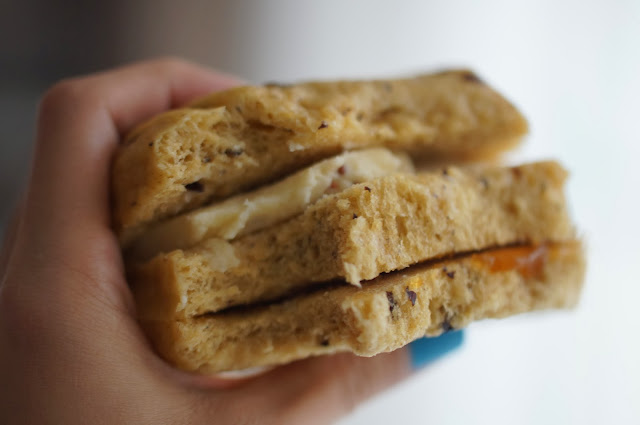
Carrot milk raisin bun (steamed)

One for me, another one for mom...

...and one for the lil' fella too...

I had mine with cheddar cheese and organic apricot jam, yum!


The steamed bun/bread remained soft even after a day in an air-tight container.

This bun is not just delicious, but super-filling! Had a big one and I still feel FULL now even though it was about 3 hours since I had it. The texture was good, definitely soft and fluffy, and this recipe is a variation from my previous raisin bun recipe. This is better, cos I ran out of A.P.flour and I added 30g superfine flour (or cake flour) to it to make up the amount, and yay! it turned out great. I also replaced the 180g of milk or cream with 100g of cream with 80g carrot juice, giving it a tinge of sweetness, which helped to mask the taste of yeast.
 
Here's the recipe, definitely a keeper recipe for steamed bun/bread
 
Recipe for starter dough:
  • 120g all purpose flour or superfine flour
  • 80g warm water
  • 1/2 tsp active instant yeast
  • pinch of salt (I forgot to add this into mine, it was ok)
  1. Mix all ingredients and knead till I get a non-sticky dough (I used a breadmachine to knead and it took about 8min).
  2. Leave in a bowl to proof for about 3 hours or until the dough double its size.
  3. This starter dough can be divided into two portion. One portion for this recipe, the other portion can be kept frozen and used in future.
Recipe for the carrot milk raisin bun:
  • 250g all purpose flour
  • 30g superfine flour
  • 20g oat flour 
  • 100g heavy cream (or milk)*, warmed in a microwave for less than 1min
  • 80ml carrot juice (freshly squeezed or commercial bottled ones)  
  • pinch of salt
  • 1tbsp brown sugar
  • 1tsp active instant yeast
  • 100g of the starter dough (from above)
  •  3 tbsp. of raisin / blackcurrant (soaked in water for about 10min before use)
*You can use milk to replace heavy cream
  1. Mix all ingredients and knead till I get a smooth, non-sticky dough (kneaded with breadmachine and it took about 13min.
  2. For the raisin/ or blackcurrant, you may add it from the beginning or later on during the second proofing. I add it from beginning, cos I wanted the raisin to slightly tear (break-apart) to give that visual / color to my steamed bun. But if you want a clean looking bun with whole raisins, then you should add it later on. (I love the way the raisins break apart and give the bun the dotted look)
  3. Leave to proof in an oiled bowl till it double its size (about 1 hour). Cover the bowl with a damp cloth when proofing.
  4. On a floured surface, punch the risen dough to knock out all the trapped gas.
  5. Roll to a flat sheet, and roll up like you're doing a swiss roll. You may add the raisin in at this step, if you haven't added them in earlier.
  6. Divide into 5 equal size portion.
  7. Leave to proof for another 30-45min.
  8. Steam for about 25min. Wrap the lid with a tea towel to prevent the condensate from dropping back onto the bun, which will uglify the outlook. Do not open the lid right away. Let cool in the steamer for about 5min,  so that the skin of the pau wont turn wrinkly.
***I prepared all steps until step 6 at night (9:30PM), then I wrap each individual ones in cling film and leave them in the fridge so that I can have them for breakfast tomorrow. They continued to proof and rise even when in the fridge. The next morning (6AM), take them out from the fridge, place them onto non-stick parchment paper and leave to proof in a warm-ish area. I left them beside by slow cooker cooking the lil' fella's porridge) for about 20min.
 

This is a recipe that's suitable for toddler (aged one year and above).


Tuesday, October 29, 2013

Raisin bun (steamed)

Whenever mom comes back to Sandakan, she always bring back a few packets (or however much she can bring) of frozen non-baked bread that she buys from Natural Health Farm in Bintulu (there's no NHF in Sandakan). She loves them cos it's organic and it's not baked. It's steamed and we just need to re-heat it by steaming it and it can be stored in the freezer and taken out on the morning you want it. I quite like the texture too, cos it's not the soft kind of texture that doesn't fill you up like the normal bun found in any bakery, and it's not heavily salted nor sweetened. We also let the lil' fella have a piece or two whenever we have it as breakfast. However, the stock depletes after about a week.
 
I felt that its texture and taste is very close to the mantou/ pau I made before, it has a tinge of buttery aroma to it. Now that I still have half a carton of cream left in the fridge after baking the cupcakes for the lil fella's birthday, need to use it up quick before it goes off, I shall try to make the NHF steamed bun using the mantou/pau recipe but incorporating cream.
 
I also have close to a kilo of flour in the fridge, the problem with it is, I DO NOT KNOW WHAT FLOUR IT IS!? Cos I forgot to label the container after I removed the flour from its original packaging. I tried to recall but to no avail. It could be all purpose flour or bread flour. I made the decision to take the risk using them for this recipe, cos it's possible to make mantou with either all purpose flour (produce moderately soft texture) or bread flour (produce firmer texture). I previously used cake flour or superfine flour to  make pau, and the texture came out really soft. Actually, I can also use this 'unknown' flour of mine to make pizza base, cos pizza base too, can be made with either A.P. or bread flour, but mom cant take too much of baked stuffs, she claimed that they give her heatiness. O.. well.. steamed bun it is then.
 
Ta da... here's my steamed bun.


Verdict: its texture is about 95% close to the NHF steamed bread (or they called it the bread of life). Yeah! Success!! It has that buttery flavor in it cos I used cream to replace milk/water. In the end, I still couldn't figure if it's A.P or bread flour I have in the container, it can highly be bread flour cos the texture is not the 'super-soft' type. But if you're a beginner in making pau/mantou/bread and you want a soft one, I would advice you to work with A.P. flour or superfine flour.
 
Recipe modified and translated from Carol.
 
First, I have to make a starter dough. According to Carol, having a starter dough improves the fragrance and texture to great extent. I left mine in room temperature for about 3hours for it to double its size. It didn't proof when in the fridge.
 
Recipe for starter dough:
  • 120g all purpose flour or superfine flour
  • 80g warm water
  • 1/2 tsp active instant yeast
  • pinch of salt (I forgot to add this into mine, it was ok)
  1. Mix all ingredients and knead till I get a non-sticky dough (I used a breadmachine to knead and it took about 8min).
  2. Leave in a bowl to proof for about 3 hours or until the dough double its size.
  3. This starter dough can be divided into two portion. One portion for this recipe, the other portion can be kept frozen and used in future.
Recipe for the raisin bun:
  • 300g all purpose flour or superfine flour
  • 180g heavy cream (or milk)*, warmed in a microwave for less than 1min
  • pinch of salt
  • 1tbsp brown sugar
  • 1tsp active instant yeast
  • 100g of the starter dough (from above)
  • 2-3 tbsp. of raisin / blackcurrant (soaked in water for about 10min before use)
*You can use milk to replace heavy cream, but add in about 30g butter for that buttery aroma (also optional).
  1. Mix all ingredients and knead till I get a smooth, non-sticky dough (kneaded with breadmachine and it took about 13min.
  2. For the raisin/ or blackcurrant, you may add it from the beginning or later on during the second proofing. I add it from beginning, cos I wanted the raisin to slightly tear (break-apart) to give that visual / color to my steamed bun. But if you want a clean looking bun with whole raisins, then you should add it later on.
  3. Leave to proof in an oiled bowl till it double its size (about 2 hours). Cover with a damp cloth.
  4. On a floured surface, punch the risen dough to knock out all the trapped gas.
  5. Divide into 8 equal size portion (maybe 6 if I want a bigger sized bun).
  6. Roll into round shape. You may add the raisin in at this step, if you haven't added them in earlier. I wrap each individual ones in cling film and freeze 5. I leave 3 in the fridge so that I can have them for breakfast tomorrow.
  7. The next morning, take them out from the fridge, place them onto non-stick parchment paper and leave to proof in a warm-ish area (I left them beside by slow cooker cooking the lil' fella's porridge) for about 30min.
  8. Steam for about 25min. Wrap the lid with a tea towel to prevent the condensate from dropping back onto the bun, which will uglify the outlook. Do not open the lid right away. Let cool in the steamer for about 5min,  so that the skin of the pau wont turn wrinkly.
 This is a recipe that's suitable for toddler (aged one year and above).
 

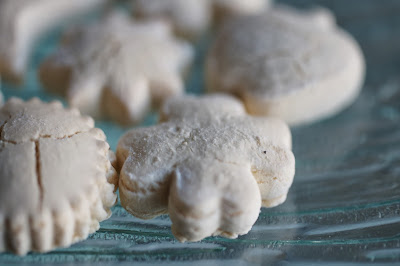
Kueh bangkit (mom's recipe)

Kueh bangkit (mom's recipe)

I purposely named this mom's recipe, cos comparing mom's to the other blogger's, hers is quite 'cin cai' (simple), the way the ingredients are being measured, check this out:
 
  • 2 packets of tapioca flour (I was like 2 packets? What packet? I thought all brands have different sizing packets? But according to her, all of them comes in 500g packing.. Hm..)
  • 400g icing sugar (we reduced this to 300g)
  • Coconut milk (from one coconut) .. again.. I was like, how big is the coconut? What if I used a huge coconut but the coconut you used was small? ..
  • 6 egg yolk
  • 5-6 pandan leaves, cut into short section, washed and dried
  • pinch of salt
Despite of the cin-cainess, the recipe turned out to be a good one. No wonder she insisted we use her recipe. We made quite a lot from this recipe (about 200 or more), but it was alright, cos we wanted to pack these into small little bags and served them as party favors for the kids for Josh's first birthday, which answers the reason why we are baking kueh bangkit in October, and CNY is not till 3 months later :p  
 
Lil' fella's first birthday's party favors


Instructions: (her recipe consists of no instructions, it's all in the memory, hahaa, but for keepsake, I better write it down)
  1. Place flour and pandan leaves in a wok. In low heat, fry until the flour is light and fluffy, and the pandan leaves turned crispy. Cool and sieve the flour.
  2. Beat eggs and icing sugar till light and pale.
  3. Add in the cooked flour and mix thoroughly.
  4. Gradually drizzle in the coconut milk until the dough is kneadable (may not need to use up all the coconut milk).
  5. Start to knead the dough, until the dough is smooth and is not sticky. Cover the dough with a damp cloth, rest for 30min.
  6. Dust the counter top with some cooked tapioca flour. Also dust the cookie cutter.
  7. Grab a chunk of dough, roll to about 0.3cm thickness, and use the cookie cutter to cut out the desired shape.
  8. Place cut out kueh bangkit onto a lined baking tray. Preheat the oven to 150deg (fan-forced).
  9. Bake for about 15-17min.
Kueh bangkit is always my favorite cookie during the Chinese New Year, I love the way it melts in the mouth when you place it inside the mouth, and this recipe does that. I am glad that we were able to bake it for my son's first birthday, glad to be trying out this recipe, cos CNY is not far away from now. Will definitely bake this for coming CNY :)
 
Note: Kueh bangkit still has that slight crisp on the outside but melts in mouth as soon as it contacts  your saliva. However, it is soft when fresh out of the oven. The crisp only appears once cooled.


Monday, October 28, 2013

My best choco-banana cupcakes


The accidentally crushed M&M created an even better effect.


Cutie mini oreo on sticks and marshmallow pops


My favorite cupcake topper - witch's broom

 
It was Josh’s first birthday cum Halloween party and I wandered on a few recipes for his birthday cupcakes. I needed a recipe that is fairly simple and straightforward, yet delicious enough to be served to all guests. I needed to bake 60 of them so it can’t be something too complicated.
Initially I wanted to use a sponge cupcake for the base. Tried out a few times, and I realized it wasn’t as ‘simple’ as I thought it would be. The yolk and white separation and beating needs to be quite precise and done well to make good cakes. So I ditched the idea after failing on a couple of attempts making good sponge cakes. My buddy Kim then suggested why not I bake chocolate cupcakes. I considered on it, and thought, why not, it’s chocolate and everybody loves chocolate.

I tried out a few different chocolate cupcake/muffins recipes and finally I chose this. This is highly rated by Ann. I tried it out about two weeks ago baking it for Karen. I realized the cupcakes were super moist and soft a few hours out of the oven. After about a day, it turned quite dry. I couldn’t understand it, cos Ann said that it remained soft and moist even after a day, and it was better after chilled.

On the actual day of baking, I made slight adjustments to it and I knew the slight adjustments shouldn’t ruin the cupcakes. I changed the milk to chocolate milk, reduced the sugar (cos I ran out of sugar), added mashed banana to the recipe and some other minor details (see below for my recipe). It turned out to be the BEST chocolate cupcakes I have ever done! It was still soft and moist even after a day, in room temperature or chilled.

I baked 60 or a little more, I didn’t count. I knew I had more than 60. Baked about 40 standard size and over 20 mini ones. I made two different types of toppings for the cupcakes. Most of the standard size ones were decorated with cute owl-face using mini oreo (which was not easily available in Malaysia, I bought them when I was travelling back from Bangkok at Bangkok Don Muang Airport), mini M&Ms and chocolate ganache (a recipe by Martha Stewart). The mini size ones were frosted using the same chocolate ganache, but whipped and topped with chopped blue M&Ms (to fit in the theme) and some were topped with my DIY witch’s hat and broom (my fav!)

Here’s my recipe for 60 choco-banana cupcakes (make your own adjustment to bake the amount you want)
Recipe modified from Ann’s must-try chocolate cupcakes
  • 300g butter, at room temperature
  • 500g sugar
  • 6 eggs, at room temperature
  • 1tbsp pure vanilla extract
  • 2.5 cup chocolate milk
  • ½ cup of whipping crème/ heavy cream (if you don’t have this, you can just replace this with milk or chocolate milk)
  • 3 tsp baking soda
  • 580g superfine flour (or cake flour)
  • ¾ tsp salt
  • 3tbsp baking powder
  • 50g cocoa powder (I forgot to tripled this from the original recipe, that’s why my cupcakes didn’t appear as dark)
  • 1tbsp chocolate emulco (optional)
  • 9 banana, ripe (I freeze the bananas whole, cos they were too ripe 3 days before the actual day, and on the night before I defrosted them in the fridge)
Instructions:
1.     Sift flour, salt, baking powder and cocoa powder in bowl. Dissolve baking soda in chocolate milk.
2.     Cream butter and sugar till light and fluffy. Add vanilla essence and eggs, one by one, continue beating.
3.     Add in the mashed banana and the rest of the ingredients, chocolate milk and flour mix. Beat till smooth.
4.     Bake in a preheated oven at 160deg (fan-forced) for about 15min (for standard size) and 12min (for mini size). Adjust the temperature for your oven. My oven is a little on the strong side.
5.    Leave to cool on rack before decorating/ frosting.
The owl-decorated cupcakes didn’t need to be chilled but the chocolate ganache frosted cupcakes must be chilled or else the frosting may melt in our temperature.

Note:
1. The Oreos turned soggy after getting in contact with the chocolate ganache.
2. Love it that it was themed Halloween. I got quite messy when decorating or frosting the cupcakes. But it was okay to my own standard, cos it's Halloween, it's supposed to be messy, not neat :p
3. Make all the preparation ahead, this is a doable recipe, I made and decorated all in about 4-5hours.
Read more about the party here:
 

Josh turns 1 birthday cum halloween party (party mode on)

The guests with kids arrived early. It was a wise choice to start the party earlier (6:30pm) so as to reduce crankiness by young babies. Been there, done that, so we knew how tough it is bringing along young babies and tried to be as accommodative as possible.


Read more about the party here:

Josh turns 1 birthday cum halloween party (pre-party preparation)

The lil' fella turns one. It was definitely a milestone to be celebrated and remembered. I started planning for his party about 2months before the actual date. We decided to hold it at home, even though there would be lots to prep and mess to clear, but it would be much cosy and free-and-easy for the babies and kids, instead of restaurant. I was right, the babies and kids were having heaps of fun playing with simple toys or just balloons. The lil' fella were so chuffed about the company that he had, and was butt-rounding all night long (his typical move whenever he's in good mood - making rounds on his butt).


The theme for the party was 'Halloween', simple enough, cos he's given birth on Halloween. Hey, wizard boy! But the dress code, for beautiful and sharp photos sake, was stripes (and/ or blue). We were very surprised yet appreciative that all the guests, adults and babies alike, were very accommodative of the dress code. We got to produce beautiful photos.


The dinner was catered, so I didn't need to get stressed about that. Hubby was the one who helped with the ordering and arrangement of the dinner catering. And the hubby also cleared the mess till about 2am after the party, while I was in dreamland with the little fella. Oppsss..
 
All along, I was planning for a beautiful treats table spread and I wanted to DIY everything, from banner, deco, photos etc etc. Finally I also made the decision that I would bake his birthday cuppies. I wandered on a few recipes and finally I chose one, and made my own modification to it. It turned out to be a great one! Best of all, it was even better the next morning, after being refrigerated! Darn! Knew it too late. Should have baked it the night before. The reason why I made it a DIY cos I wanted it to be remembered (by ourselves, doubt he will remember much of it) and I loved the feeling of prepping for it. Being involved. And the satisfaction.
 
The first part started about a month ahead, when I started making the party invite (e-invite), cupcakes toppers, birthday banners, deco etc.

A simple party invite I designed.


Then, mom came back to Sandakan. She helped carved Old Jack. Old Jack was carved about 5 days before the big day. He aged nicely, which added onto the effect. On Friday, sis-in-law came back to Sandakan, and she carved cheeky looking Baby Jack. It was her first time carving and she made a beautiful one. Both Old and Baby Jack served us well. When the lil' fella grows up, I will engage him in the customary 'trick-or-treats' so that he won't get missed out on such fun stuffs.


Mom and I baked her favorite recipe of Kueh Bangkit as party favors for the kids, because it's something that melts in the mouth, and something that appeals for both kids and adults alike. Many guests were appalled by the look of it, cos it usually doesn't appear till CNY.


I was very glad that both mom and sis-in-law were back for his birthday bash. They helped to babysit Josh while I was busy prepping the treats and cuppies.
 
On the morning of the day of celebration, mom and I woke up early. Mom prepared the red eggs, while I baked 60 choco-banana cupcakes to be frosted and decorated. Josh woke up a little late that day, which gave us sufficient time to get everything prepared before we all went out for yam cha with gung gung and popo and gupo (the in-laws).
 

Josh gets entertained w. his new ride when popo and mommy made final touches to the cupcakes
 
Read more about the party here:
Related Posts Plugin for WordPress, Blogger...